Rainfall data forms a necessary input to the catchments, which during analysis processes the inputted data as rainfall events, which are then converted to flows assigned to an outlet node. A single rainfall event will be assigned to all subcatchments in this example.
To enter timeseries data for a rainfall event, go to Model Data > Model Tables > Edit Curves. Select 'TimeSeries' from the Pattern Type drown down list and then click New Curve.
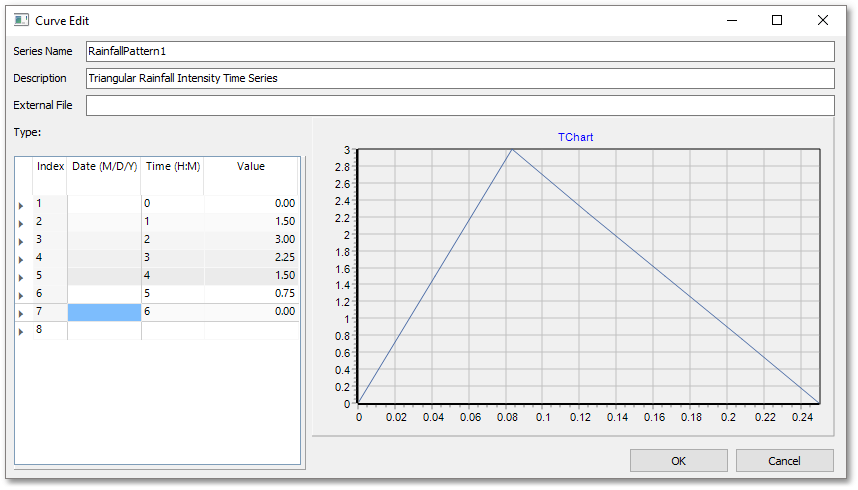
Enter 'RainfallPattern1' under Series Name, Description and External File are left blank. A simplified, triangular hydrograph will be used. The Date column can be ignored, under Time enter numbers from 0 to 6, and under Value enter the following numbers: 0, 1.5, 3, 2.25, 1.5, 0.75, 0. This will create a triangular pattern, displayed as per the below:
The Albion drawing contains a point above Catchment 1 that represents the rain station to be used for the catchments, this geometric point must be converted to a rainfall station in order to assign rainfall related properties to it. To do this, click on the Add Rainfall Station icon  , then click on the rainfall station point. This will add a rainfall station over the point and the rainfall station icon will appear as follows:

The time series data must now be assigned to the rain-station along with other necessary parameters. Left-click on the rain station and enter the following parameters:
Rain Format: INTENSITY
Time Interval: 1
Data_Source: TIMESERIES
Series_Name: RainfallPattern1
This rain-station will be assigned to all of the catchments in this example.
The necessary properties must now be assigned to the Catchments. Catchment width is given by the catchment area divided by the average maximum overland flow length. Normally this would be calculated using the average of a number of overland flow paths, however in this example, only a single indicated flow path will be used.
Using Catchment 1 as an example, the area is 57 000 m2 and delineated watercourse path is 357.99 m. The length of the watercourse in this case is obtained by querying the length of the polyline on the drawing (Shown as a fine dotted line over the catchment), giving a width of 159.22 m (57 000/357.99).
Another method for obtaining the catchment watercourse length is to delineate it by navigating to Model Data -> Model Topology -> Calculate Catchment Watercourse. The catchment in which the watercourse is to be placed is then selected and the watercourse delineated. This method will add an entry to the watercourse table as well as the catchment table. As the catchment width is a parameter that can be calibrated, it is not auto-completed by HydroSWMM and needs to be entered manually after calculation.
Left-click on Catchment 1 to open the properties tab and enter 'Catch1' as the Code for Catchment 1. Catchment 1 will also be draining to Junction 1, therefore the Code 'J1' will be used under the Drain To option.
The following properties apply to all catchments in this example system:
RainGage: Rain1
Percentage Slope: 0.5
Impervious Percentage: 50
Manning Impervious: 0.01
Manning Pervious: 0.1
Depression Storage Impervious: 0.05
Depression Storage Pervious: 0.05
Green-Ampt Method
Infiltration - Suction Head: 3.5
Infiltration - Conductivity: 0.5
Infiltration - Initial Deficit: 0.26
Zero-Impervious Percentage: 25
Percent Routed: 100
Subarea Routing OUTLET
Once all of the pertinent information has been added to each of the catchments, it is time to run a time simulation on the constructed model.